3 Aralık 2015 Perşembe

Güncel Windows Update Windows7 Cd oluşturma

Create An Integrated Up To Date Windows 7 Install Disc


There’s little doubt that Microsoft has been busy over the last few years with the release of Windows 8, and Windows 8.1 about a year later. Since then Windows 8.1 itself has had 2 major updates which could traditionally be called Service Packs, and Microsoft are now working on Windows 10. Yet according to statistics, there remains a Windows operating system that has more users than all other operating systems in the world combined and is still supported by Microsoft.
That is of course Windows 7 which was released in 2009. Ridiculously Windows 7 has received only one Service Pack in over five years, and has had no updated install DVDs or ISOs since 2011. If you install Windows 7 these days and then run Windows Update, the list of hotfixes and patches is staggering, and well over 150 before you even get to extras like .NET Framework! If you’re continuing to use Windows 7, with the unending amount of updates to install, what’s the best option if you want to install Windows 7 in future?
windows 7 updates after install
A quick way to update Windows is by installing patches from an offline source such as a USB flash drive or hard drive, this is faster than Windows Update via the internet but still takes time. A better option is to integrate all the updates into the Windows media so they are installed as part of the original operating system. Windows XP has a popular tool called nLite to do this, Vista has its own version called vLite which doesn’t work too well with Windows 7 Service Pack 1. Here we’ll show you how to slipstream most of the post Service Pack 1 Windows 7 updates into a Windows install media, including newer Internet Explorer and .NET versions. This means minimal updates are required from the start and Windows doesn’t become bloated with hundreds of separate updates before you even start to use it. Although this may seem complicated, the process is quite easy once you’ve gone through it once or twice.

Downloading the Required Windows Updates

The first thing you need is obviously a copy of all the Windows updates that are needed to integrate into the install media. For this purpose we find the Windows Updates Downloader (WUD) tool is most useful because it’s easy to use and the update lists are periodically updated to reflect the latest patches. Here’s how to download the needed files.
1. Download Windows Updates Downloader and install the program.
2. Go to the Update Lists page on the same website and download the list you want for Windows 7 (32-bit or 64-bit). Once downloaded, double click the .ULZ file to add the list to the WUD program.
update list for windows 7
When you wish to created an updated Windows 7 media you can simply visit this page again and download an updated list and then download the required missing updates.
3a. Open the WUD program and make sure the Update list in the drop down is for Windows 7 Service Pack 1 x86 or x64. This next part is important because you don’t need all of the updates on offer, only those required to get Windows up to date in patches. In the main window tick the boxes for Security Updates, Non-Security Updates, .NET Framework 3.5.1 Updates and WMP12 Updates.
WUD select updates
3b. Expand Optional Updates and tick the box for Internet Explorer 11. Additionally you can also select Silverlight, .NET Framework 4.5.2 and the Malicious Software Removal Tool from the “MS Security Products” category. Finally click Download to start downloading all the updates, there should be over 200 so it might take a while.
4a. You now need to download another update list which fills in the gaps because the standard list doesn’t download everything, Remote Desktop and some other patches are missing and will otherwise show in Windows update. We have created the ULZ file below to download the extras from Microsoft, download and double click it to import into WUD.
Download Windows 7 Extra Updates ULZ File 32-bit
Download Windows 7 Extra Updates ULZ File 64-bit
4b. Select the Extras list from the drop down and tick the Extra Security Updates and Extra Non-Security Updates boxes, additionally tick the .NET 4.5.2 Updates box if you plan to integrate the latest .NET Framework. Finally click Download to get these updates.
WUD extra updates
Alternative: There is also another program that you can use for downloading updates called Windows Hotfix Downloader  although it downloads almost double the amount of updates, most of which are not required for general use. This not only increases the download times but also vastly increases the time it takes to integrate the updates into the Windows media.

Integrate The Updates Into The Windows Media

Now you have the updates ready, they can be integrated into the media. We’ve mentioned nLite and vLite above, and the good news is the same developer has created a new tool called NTLite that does similar but works on windows 7, Windows 8/8.1 and even Windows 10. NTLite is still in beta but has been fine during testing and is also shareware so not all options are available, but the needed integration functions are available in the free version.
1. First and foremost you need a Windows 7 Service Pack 1 DVD or ISO image to hand. If you don’t have one you can download an official SP1 ISO which can be burned to DVD or written to USB later.
2. Copy the contents of the DVD to a folder on your hard drive, an ISO can be extracted with an archiver such as 7-Zip or mounted as a virtual drive and then everything copied to a folder.
3. Download NTLite Free  and install it (a portable mode is available during install).
4. Launch it and click the Add button and browse to the folder you extracted/copied in step 2, click Select Folder. Windows 7 will then show in the Target list.
ntlite add target os
5. Right click the operating system in the list and select Load, the program will extract the Install.WIM to the Temp folder. The operating system will then show as Loaded with a green icon and a number of options will be available down the left side of the window.
ntlite loaded os
6. Click the Updates option on the left, this is where all the updates are integrated but it’s incredibly easy to add them.
Click the arrow below the Add button and choose Folders and subfolders found packages, then browse to the folder you saved the downloaded patches from Windows Updates Downloader above, and click Select Folder. After a few seconds the list will be populated with all the updates to integrate. NTLite will add the updates in the best order automatically.
integrated updates list
If you don’t want to install the extras of Silverlight, .NET Framework 4.5.2 and the Malicious Software Removal Tool etc, you can now begin the task of starting the integration process. If you do want to add them, go straight to the section on page 2 about adding optional extras although you can still integrate the updates first and add the extras later.
7. Click the Apply button, tick the Create ISO image box at the top and choose the save location and file name for the ISO image file. Press the Green Start button and wait for the process to finish.
ntlite start integration
The speed of the integration process depends a great deal on the speed of your system’s drives, a fast system with an SSD could finish in under half an hour, a low spec desktop or laptop could take a couple of hours or more.
Tip: The whole integration process can be sped up massively by using an SSD or even a RAM drive if you have tons of memory (16GB+). NTLite defaults to the Windows Temp folder which is usually on C, so if you have moved your temp files folder from your SSD drive it would be a good idea to go to File > Settings and change the “Temporary file directory” to a folder on an SSD or RAM drive. In short, put the folder on the fastest drive your system has with at least 7GB of free space.
change ntlite temp folder
8. Once completed, you will have an ISO image which can then be burned to DVD, written to USB flash drive or loaded in to virtual machine software such as VirtualBox or VMware Player for testing. Note that after installation is complete and you’re at the desktop a reboot is required before you can check for updates. This is due to some updates which NTLite decides cannot be integrated and are instead installed on first logon.
available updates after integration

With a check of Windows Update you can see we only have a few updates left which can be included by reading the next section. Do be aware that you still might have drivers and any other updates which are region or language specific to download, but the vast majority are now already installed.


Adding Windows Update Optional Extras

Even though you might have all the hotfixes, security patches and Internet Explorer 11 integrated, there are still other components offered by Windows Update such as .NET Framework 4.5 and the Malicious Software Removal Tool. As these are executable installers instead of Microsoft Update (MSU) files they can’t be integrated but are installed silently on first logon of the newly installed operating system. Here’s how to add them.
1. Assuming you have already downloaded the programs you want to add using Windows Updates Downloader, and gone through step 6 of the main guide to add all the patch files in the Updates window, press Post-Setup on the left and accept the warning after reading it.
2. Click the arrow below the Add button and select Add File. Browse to the Windows Updates Downloader folders and choose an add on from the Optional Updates or MS Security Products folders.
3. The setup installer will appear in the list, simply enter /q into its parameter box so the install will be silent and automatic.
add optional updates
If you’re adding .NET Framework 4.5 and all its patches, make sure to add the main installer first and then each update in turn from lowest KB to highest to avoid issues.
4. Once you have added what you want, proceed to step 7 of the integrate guide and continue with the integration (Apply, enable create ISO and then Start).
You can also include third party software installers in this section such as CCleaner, Paint .NET, Malwarebytes Anti-Malware and etc, but we won’t go into that here as this article’s focus is on Windows updates. All you really need to know is the switches to make the install automatic, /q or /quiet works in a lot of cases.
During the Windows setup process the entries in the Post-Setup list will be installed at the “Windows is finalizing your settings” screen shown below, the computer could stay on this screen for several minutes depending on the number of programs and updates to install, so don’t panic as the system hasn’t hung or crashed.
finalizing setings
Note: A few times while testing we encountered a problem after integration and installation that Internet Explorer keeps displaying the “meet your new Browser” welcome page and loads the tab every time you open the browser. To stop this happening you can add a command in the Post-Setup window. Click Add > Add Command and enter Reg in the left Item box, enter the following in the parameters box:
add "HKLM\Software\Policies\Microsoft\Internet Explorer\Main"
/v DisableFirstRunCustomize /t REG_DWORD /d 1 /f
add registry welcome disable command
Alternatively download the small batch file below and either add it to the Post-Setup window as a file or execute it after installation of Windows (run as admin) if you find you have the problem.
Download Disable IE welcome Batch File

Integration With a Multiple Version Windows 7 ISO or DVD

Many users will know that an official Windows 7 DVD or ISO image only allows installation of a single version of Windows, if you have a Home Premium disc you can’t install Professional or Ultimate with it. There is an easy way around this by deleting the ei.cfg file from the Sources folder to unlock all versions on the same disc.
When you perform an integration it is effective on the Windows version you have chosen only, to update all on a single disc you have to run the integration for each version you want to update one at a time. The major downside is this increases the time taken to create a fully updated install media by several times.
The procedure is slightly different when updating multiple Windows versions as opposed to a single version on the same disc.
1. After browsing for the copied/extracted Windows 7 files in NTLite, all the versions available will show up in the target list. Choose which one you want to work on first and go through steps 5 and 6 from the main integration guide to perform the updating.
multiple version Windows targets
2. Instead of following step 7, click the Apply button, do not tick “Create ISO image” but untick the Export image option. Press the Start button and wait for the process to finish.
untick_export_image
3. After integration has completed and the image has been unloaded, click Target on the left, select and load the next version you want to update. The list of updates to integrate will have been remembered so when you go to the Updates or Post-Setup window the list will already be populated, all you have to do is apply the updates again. Your actions are also saved as a preset which can be loaded again at a later date.
4. After the last integration is finished right click on any version you’ve updated in the target list or the operating system entry and choose Create ISO.
create multiversion iso
During the install process you will still be given the choice to install any of the Windows 7 versions available on the media, the ones you have edited through NTLite will be fully up to date once installed. This method should also work if you have created an All-in-one install media with both 32-bit and 64-bit versions of Windows 7, although you have to be extremely careful about not integrating the wrong architecture updates, i.e. not using 32-bit updates on a 64-bit version, and vice versa.

Adding Your Own updates to the Integration Process

If you find there are any updates for Windows missing and they haven’t been included in the download lists, you can add them manually if you know the KB number of the update.
1. Visit the Microsoft Download Center  and type the KB******* into the search box, adding either x86 or x64 helps narrow things down. Click on the link for the update that looks like the correct one.
search windows update
2. Check the details on the download page and if it’s correct press the Download button to download the update file.
update download page
3. Move the downloaded file to the Windows Updates Downloader folder. If it’s a Microsoft Update file (.MSU) or a CAB file it can be integrated from the Updates window in NTLite, if it’s a setup executable (.EXE) it can be added in the Post-Setup window of NTLite.

Note: Users who have previously been involved with slipstreaming using tools like nLite for XP will know there are many other functions you can perform within the software and NTLite is no different. You can also perform unattended installs so you’re not asked for interaction during install, adjust settings such as Windows Service states, integrate drivers and remove Windows features. The full removal feature set is only available in the paid version of NTLite which starts at a rather hefty $45.

Do be aware that using NTLite to remove any features and components from Windows could break the integration and cause any number of issues because you might be adding updates and the components or required files have been removed.

Kaynak : https://www.raymond.cc/blog/create-an-integrated-up-to-date-windows-7-install-disc/


30 Kasım 2015 Pazartesi

Araç çubuğu icon kaybolması

Aşağıdaki adımları sırası ile uyguladığınız taktirde sorun çözülmektedir.Fix kurulumundan sonra mutlaka Registry ayarlarıda mutlaka yapılmalıdır.

                 System icons do not appear in the notification area in Windows Vista or in Windows 7 until you restart the computer

Problem description
When you start a computer that is running Windows Vista or Windows 7 for the first time, one or more of the following icons do not appear in the notification area in the lower-right corner of the screen.
  • The Network icon
  • The Volume icon
  • The Power icon
You may also notice that the check boxes for the related system icons are not selected on the Notification Area tab of the Taskbar and Start Menu Properties dialog box. However, the network, volume, and power features function correctly even though their associated icons do not appear in the notification area. You can access these features by using Control Panel.

If you gave your computer enough time to finish the startup service initializations before you restarted it, and one or more of the system icons still do not appear in the notification area after the restart, you can make them reappear by deleting two subkeys from the registry.

To have us do this for you, go to the “Fix it for me” section. If you’d rather do this yourself, go to the “Let me fix it myself” section.
Fix it for me

Fix it for me

To run a workaround for this problem automatically, click the Fix this problem link. Then, click Run in the File Download dialog box, and follow the steps in this wizard.


Note This wizard may be in English only. However, the automatic fix also works for other language versions of Windows.

Note If you are not on the computer that has the problem, you can save the automatic fix to a flash drive or to a CD, and then you can run it on the computer that has the problem.

Now go to the "Did this fix the problem?" section.

Let me fix it myself
When you first start a new computer, the operating system typically runs startup service initializations that may take from one to six hours to finish, depending on which applications are preloaded on the computer. Make sure that you give the operating system sufficient time to finish these startup service initializations before you shut down or restart the computer. This issue typically will not recur after the operating system has finished initializing all the background services before it is restarted.

Note You can determine whether these service initializations are finished by observing the hard disk light activity (if your computer has this feature). If the hard disk drive light blinks intermittently instead of being solidly lit, these service initializations might be finished. You can also check CPU usage on the Performance tab in Windows Task Manager. If CPU usage is less than 15 percent, the service initializations are probably completed, and you can shut down or restart the computer. You can make the icons reappear by deleting two subkeys from the registry. To do this, follow these steps.

Note You may have to reapply this workaround after you restart the computer if the icons still do not appear in the notification area.

Important This section, method, or task contains steps that tell you how to modify the registry. However, serious problems might occur if you modify the registry incorrectly. Therefore, make sure that you follow these steps carefully. For added protection, back up the registry before you modify it. Then, you can restore the registry if a problem occurs. For more information about how to back up and restore the registry, click the following article number to view the article in the Microsoft Knowledge Base:
322756 How to back up and restore the registry in Windows
  1. Click Start Start button, type regedit in the Start Search box or the Serach programs and files box, and then press ENTER.

    User Access Control     permission If you are prompted for an administrator password or for confirmation, type the password, or click Allow.
  2. Locate and then click the following registry subkey:
    HKEY_CURRENT_USER\Software\Classes\Local Settings\Software\Microsoft\Windows\CurrentVersion\TrayNotify
  3. In the Details pane, click the IconStreams registry entry.
  4. On the Edit menu, click Delete, and then click Yes.
  5. In the Details pane, click the PastIconsStream registry entry.
  6. On the Edit menu, click Delete, and then click Yes.
  7. Exit Registry Editor.
  8. Restart the Explorer.exe process. To do these, follow these steps:
    1. Press CTRL+SHIFT+ESC.
    2. On the Processes tab in Task Manager, click the explorer.exe process, and then click End Process two times.
    3. On the File menu, click New Tasks (Run), type explorer, and then click OK.
    4. Exit Task Manager.
  9. If you are running Windows 7, follow these additional steps:
    1. Click StartStart button, type Customize icons and then click Customize icons on the task bar.
    2. Click Turn system icons on or off, and then set Volume, Network, and Power System to On.
    3. Click OK, make sure that the behavior for Power, Network, and Volume are set correctly, and then click OK

23 Kasım 2015 Pazartesi

LaserJet Pro MFP M476dn Print Sorunu

 Microsoft Windows 7 Professional (64-bit) işletim sistemi olduğunda ikiden fazla çıktı almaya çalışıldığında not responding düşüyor ve spooler hatası veriyor.

Hp ile görüşmelerde HP Universal Print Driver for Windows PCL5 (64-bit) sürücü kurulduğunda problemin giderildiği görülmüştür.

19 Kasım 2015 Perşembe

Stackhash APPCRASH Hatası

1.İlk olarak başlat- search bölümüne services.msc yazıyoruz.Açılan bölümde servisler listesinden windows update buluyoruz.Startup type bolumunde disabled seçtikten sonra Apply tıklıyoruz.Daha sonra stop tıklıyarak birinci aşamayı tamamlıyoruz.


2.İkinci aşamada aşamada registry tarafında aşağıdaki ayar yapılacaktır.

http://uzmanbt.blogspot.com.tr/2015/10/outlook-loading-profile-sorunu.html

3.Tüm işlemler bittikten sonra aşağıdaki penceler ile ilerliyor olacağız.


Bilgisayarım simgesine sağ tıklayıp properties - Advanced - Performance bölümündeki - Settings - Data Execution Prevention - Turn on DEP for all programs and services except those I select seçtikten sonra burda asıl soruna sebep olan stackhash varsa buda kaldırılacaktır, ayrıca burda bulunan diğer tüm uygulamaların check işaretini kaldırması tavsiye olunur.

4.Tüm bu işlemlerden sonra restart edilmesi önerilmektedir.

5.Tekrar windows update almak istenirse servislerden windows update aktif hale getirilmelidir.

10 Kasım 2015 Salı

Windows 7 CMD Komut Satırı Kapatma, Restart ve Diğerleri

  • shutdown -r — restarts
  • shutdown -s — shutsdown
  • shutdown -l — logoff
  • shutdown -t xx — where xx is number of seconds to wait till shutdown/restart/logoff
  • shutdown -i — gives you a dialog box to fill in what function you want to use
  • shutdown -a — aborts the previous shutdown command....very handy!
Additional options:

  • -f — force the selected action

15 Ekim 2015 Perşembe

Windows 7 Update Donma Sorunu Hakkında

1. Windows+R tuşlarına basarak çalıştır'ı açın.
2. msconfig yazıp enter'a basın.
3. hizmetler bölümünde "tüm microsoft hizmetlerini gizle" kutucuğunu tıklayın.
4. kalan tüm bileşenleri "tümünü devre dışı bırak" seçeneği ile "durduruldu" haline getirin.
5. uygula deyin ve bilgisayarı yeniden başlatın.
6. windowsupdate'ten güncellemeleri yükleyin (kb2770917de dahil olmak üzere, bende 2 tane vardı.)
7. bilgisayarı yeniden başlattığınızda güncellemenin %15'te takılmadığını ve başarıyla tamamlandığını göreceksiniz.
8. yeniden başlattıktan sonra tekrar msconfig'e girerek daha önce durdurduğunuz tüm progRamları başlatın.

9. bilgisayarınızı son kez açıp kapattığınızda güncellemeyi sorunsuz yüklemiş olacaksınız.

Office 365 Troubleshooter

Server 2012 ve Windows 8 Deneme Süresi Uzatma

Aşağıdaki komutları sırasıyla cmd sarıtında admin olarak çalıştıracağız.Daha sonra makina restart olucak ve windwosu active ettiğinde süre 180 güne çıkacaktır. ;) 5 hakkımız var daha sonra tekrar kurmak gerekiyor.Aşağıda daha detaylı acıklamalar var.

1- slmgr.vbs –dli
2- slmgr.vbs -rearm

Extending evalution period of Windows Server 2012 up to 1080 days ( with legal slmgr –rearm )
Windows Server 2012 sürümlerinin yasal deneme kopyalarını aşağıdaki adresten indirebilir, 180 gün boyunca ve teknik özellikler açısından herhangi bir kısıtlama olmaksızın test edebilirsiniz.
http://www.microsoft.com/en-us/server-cloud/windows-server/trial.aspx
Windows Server 2012 Standard Deneme Sürümü
Windows Server 2008/R2 ‘de kullandığımız ve deneme periyodunu reset’leyerek genişleten slmgr -rearm ‘ın Windows Server 2012 ‘de ne durumda olduğuna bakmak istedim ve ortaya çok ilginç bir sonuç çıktı. Tüm dünya genelinde bu konuyu ilk ke z bu blog’da okuyorsunuz :)
ÖNEMLİ UYARI:
-rearm parametresini alan slmgr.vbs, Windows Server içerisinde yerleşik olarak gelen bir script’tir ve bu yazıda bahsedilen yöntemde herhangi bir illegal durum söz konusu değildir. Amacı periyotları sıfırlamak olan -rearm parametresi, sistem tarafından izin verilen sayda çalıştırılarak kullanılabilir. Dikkat edilmesi gereken önemli bir nokta ise şudur: Bu yöntemin uygulandığı deneme (evaluation) kopyaları, kurulumu yaparken de okuyabileceğiniz son kullanıcı lisans anlaşmasına (EULA) göre kesinlikle herhangi bir ticari amaç için kullanılamaz ve kesinlikle canlı ortamlarda konumlandırılamaz. Deneme kopyalarının sadece ürünün özellikleri ile ilgili ilk testlerin yapılması, bt uzmanları ve yazılım geliştiriciler için adaptasyonunun hızlandırılması veya ön gösterim gibi amaçlar için kullanılmasına izin verilmektedir. Eğer bir deneme kopyası ile çalışıyorsanız, EULA içerisindeki kapsama uymanız gerekir. Aksi durumda legal bir yöntem ile illegal bir sonuca ulaşmış olursunuz ve hukuksal açıdan sorumluluk altına girebilirsiniz. Ek olarak Windows Server 2012 Evaluation kopyalar üzerine deneme periyodunun herhangi bir anında geçerli bir ürün anahtarı girip yeniden aktive ederek FULL sürüme yükseltebilirsiniz.
slmgr.vbs (Windows Software Licensing Management Tool) işletim sistemi lisansınız hakkında detaylı bilgiler alabileceğiniz ve müdahalelerde bulunabileceğiniz bir script’tir. Örneğin işletim sistemi lisans tipinin (volume, retail, oem) öğrenilmesi, aktivasyon, ürün anahtarı girişi/değişimi, deneme ve aktivasyon periyodlarının reset’lenmesi, KMS etkileşimi gibi bir çok lisans yönetim işlemini slmgr.vbs üzerinden komut satırı tabanlı olarak gerçekleştirebilirsiniz.
Bir Windows Server 2012 deneme kopyası ilk kez kurulduğunda 10 günlük aktivasyon periyodu ile başlar ve bu süre içerisinde aktivasyon işlemini tamamlamanızı bekler.
Windows Server 2012 - Aktivasyon Periyodu
180 günlük deneme süresinin başlangıcı için gerekli olan aktivasyon işlemi sırasında herhangi bir ürün anahtarı girmenize gerek yoktur çünkü deneme kopyası kendi içerisinde bir ürün anahtarı ile kurulur.
Windows Server 2012 - Aktivasyon Merkezi
Şayet deneme kopyasının internet erişimi varsa direkt Activate butonuna tıklayarak veya slmgr -ato parametresi ile aktivasyonu gerçekleştirip 180 günlük deneme periyodunu başlatabilirsiniz. Eğer internet erişimi yoksa Activate by phone seçeneği ile telefon üzerinden aktivasyon yapmak da mümkün.
Windows Server 2012 Aktivasyonu
Aktivasyon işleminin ardından 180 günlük deneme periyodunun başladığını yine slmgr -dli ile doğrulayabilirsiniz.
slmgr -dli
Gelelim 180 günü nasıl genişletebileceğinize.
slmgr -dlv ile lisans detaylarını çektiğinizde Remaining Windows rearm count: 5 şeklinde bir bilgi göreceksiniz.
Remaining Windows rearm count
slmgr ‘nin –rearm parametresi, sistemin lisans durumunu reset’lemek için kullanılır ve yukarıdaki sayaç bilgisine göre bu parametre 5 kez çalıştırılabilir.
Windows Server 2008 R2 ‘de bu sayaç için değer 3, bir deneme periyodu 60 ve toplamda 240 güne ulaşılabiliyordu.
Windows Server 2012 deneme kopyaları için slmgr -rearm komutunu her periyodun 180. (yani son) gününde çalıştırarak periyodu reset’lerseniz,
slmgr -rearm
image
ilk 180 gün + 1. 180 + 2. 180 + 3. 180 + 4. 180 + 5. 180 toplamda 1080 gün boyunca deneme kopyanızı yeniden kurmadan test etmeye devam edebilirsiniz.
6. rearm denemesinde başka hakkınız kalmadığını göreceksiniz.
Errpr 0xC004D307
Bu noktadan sonra 1080 gün sonunda trial kopyayı yeniden kurabilir veya satın alacağınız Windows Server 2012 sürümüne ait geçerli bir ürün anahtarı girerek full sürüm şeklinde kullanmaya devam edebilirsiniz.
Bu arada 1080 gün demiştik ya, ilk aktivasyon öncesi gelen 10 günlük periyodu da sonuna kadar kullanıp toplamda 1090 güne ulaşmak mümkün.
ÖNEMLİ UYARI:
Bu yöntemin uygulandığı deneme (evaluation) kopyaları, kurulumu yaparken de okuyabileceğiniz son kullanıcı lisans anlaşmasına (EULA) göre kesinlikle herhangi bir ticari amaç için kullanılamaz ve kesinlikle canlı ortamlarda konumlandırılamaz. Deneme kopyalarının sadece ürünün özellikleri ile ilgili ilk testlerin yapılması, bt uzmanları ve yazılım geliştiriciler için adaptasyonunun hızlandırılması veya ön gösterim gibi amaçlar için kullanılmasına izin verilmektedir. Eğer bir deneme kopyası ile çalışıyorsanız, EULA içerisindeki kapsama uymanız gerekir. Aksi durumda legal bir yöntem ile illegal bir sonuca ulaşmış olursunuz ve hukuksal açıdan sorumluluk altına girebilirsiniz. Ek olarak Windows Server 2012 Evaluation kopyalar üzerine deneme periyodunun herhangi bir anında geçerli bir ürün anahtarı girip yeniden aktive ederek FULL sürüme yükseltebilirsiniz.
Ayrıca, 90 gün ile başlayan Windows 8 Enterprise deneme periyodunun aynı yöntem ile 180 güne kadar genişletilebilmesi ile ilgili bir yazıya aşağıdaki adresten ulaşabilirsiniz:
Kaynak :
http://www.serhatakinci.com/index.php/windows-server-2012-deneme-sresi-1080-gn.html
http://www.serhatakinci.com/index.php/windows-8-enterprise-deneme-sresi-180-gn.html


Printer Sorunları Kaybolma ve Print Spooler

1. Yol.

Print spooler servisi sürekli duruyor. (Yazdırma Biriktiricisi)

Yazıcı biriktiricisi hizmeti sürekli duruyorsa; •Servisler den Print Spooler' i (Yazdırma Biriktiricisi) durdurun •System32 klasörünün altında yer alan spool ve onun altında yer alan PRINTERS klasörünü açın •PRINTERS klasörü altında *.shd ve *.spl uzantılı tüm dosyaları silin •Print Spooler' i başlatın •Sorunsuz olarak kullanmaya başlayabilirsiniz.

2. Yol.

Print server üzerinde bir yazıcı driverini güncellediğinizde, cliente daha önce tanıtmış olduğunuz bu yazıcı eski sürümde kaldığından kendini bu yeni driver sürümüne güncellemeye çalışacağından çakışma ve driver arızası verir.
en iyisi böyle büyük yapılarda print serverde driveri güncellememektir, ve mümkünse universal driver kullanılmalı.

3.Yol.

HP printerların Windows7 x64 makinelere driver kurarken oluyordur.
Hp ile bu konuda çok görüştüm. Hp universal printing PCL5 driverını kurarak çözüme ulaştım.

4. Yol.

ağda paylaşılmış ve otomatik eklenen yazcı varmı kontrol edin. bu cihazların sürücüleride buna sebep oalbilir.

5. Yol.

print spooler seçeneklerinden kurtarma tabındaki 3 seçeneğide restart şeklinde seçersen spooler durma sorunu düzelecektir..

Eski Printerları Kaldırmak İçin :

https://www.youtube.com/watch?v=D5wAayWSfZk

Kaynak : http://www.cozumpark.com/forums/thread/393377.aspx 

Android telefon veya tablette e-posta ayarlarını yapma

Android telefon veya tabletinizde ayarlamak istediğiniz e-posta hesap türünü seçin:
Ek Office 365 mobil uygulamaları arıyor veya farklı bir cihazı mı ayarlamak istiyorsunuz? Bkz. Office 365 mobil kurulumu. Bir bilgisayar veya Mac ayarlamak için (dizüstü bilgisayar, masaüstü veya 2’si 1 arada bilgisayar dahil) bkz. Office 365 yükleme ve kurulum

@outlook.com, hotmail.com, msn.com veya live.com ile biten e-posta hesabını ayarlama

İpucu   Android’inizin görünümü farklılık gösterebileceği için, buradaki adımları kılavuz olarak kullanın veya söz konusu cihazınız için üreticinin yardımına danışın.
Outlook uygulaması Android için Outlook Kullanma
Android posta uygulaması Yerleşik Android posta uygulamasını kullanma
Not   Android için Outlook için, Android 4.0 veya daha yeni sürümünü çalıştıran bir cihaz gerekir. Uygulama kullanılabilirliği değişiklik gösterebilir, dolayısıyla ülkenizde nelerin kullanılabildiğini öğrenin.
  1. Henüz yüklemediyseniz, Google Play mağazasından Android için Outlook’u indirin.
    Cihazınızda yüklüyse uygulamayı açın ve cihazınıza bağlı olarak, Android’inizin en altındaki gezinme denetimine dokunun veya Diğer > Ayarlar > Hesap Ekle’ye dokunun.
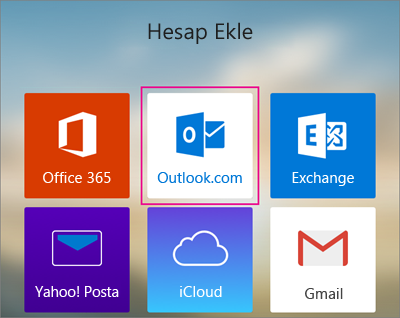
  2. Hesap Ekle’de, @outlook.com, @hotmail.com, @msn.com veya @live.com ile biten Outlook e-posta hesabınız varsa, Outlook.com’u seçin. Bu, @outlook.co.uk gibi uluslararası etki alanları ile Outlook.com’da barındırılan tüm özel etki alanlarını da kapsar.
    Farklı bir posta hesabınız varsa diğer seçeneklerden birine dokunun. Örneğin, bir Gmail hesabı eklemek istiyorsanız Gmail’e dokunun.
    Outlook.com hesabı ekleme
  3. Tam e-posta adresinizi (örneğin, <birisi>@outlook.com) ve parolanızı girin ve ardından Oturum aç'a dokunun.
  4. Uygulamanın bilgilerinize erişmesine izin vermek için Evet’i seçin. Android için Outlook, hesabınızı eşitlemeye başlar.
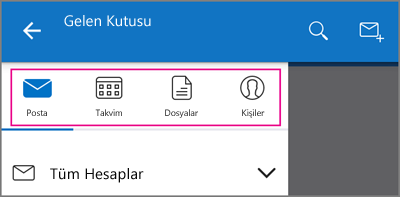
  5. Uygulamadan takviminizi, dosyalarınızı veya kişilerinizi görüntülemek için, Diğer Diğer seçenekler’e dokunun.
    Posta, takvim, dosya veya kişi seçin
  6. Android için Outlook kullanma konusunda daha fazla bilgi edinmek için, cihazınızın alt tarafındaki gezinme denetimine dokunun veya Diğer > Yardım’a dokunun. Veya bkz. iOS ve Android için Outlook hakkında sık sorulan sorular sayfasına gidin.
Ayrıca, @outlook.com, @hotmail.com, @msn.com veya @live.com email ile biten e-posta hesabınızı denetlemek için cihazınızdaki tarayıcıyı da kullanabilirsiniz. http://m.mail.live.com adresine gidin ve e-posta hesabınızla oturum açın.
Android için Outlook’ta birden fazla hesabınız olabilir. Eklemek istediğiniz hesap türünü seçin ve gösterilen adımları izleyin.
Bir hesabı silme
  1. Cihazınıza bağlı olarak cihazınızın alt tarafındaki gezinme denetimine veya Diğer > Yardım’a dokunun.
  2. Silmek istediğiniz hesaba dokunun.
  3. Hesabı Cihazdan ve Uzaktan Sil’i seçin.
Android için diğer Office 365 kaynakları hakkında bilgi için bu sayfanın sonundaki Ayrıca Bkz. bölümüne bakın.
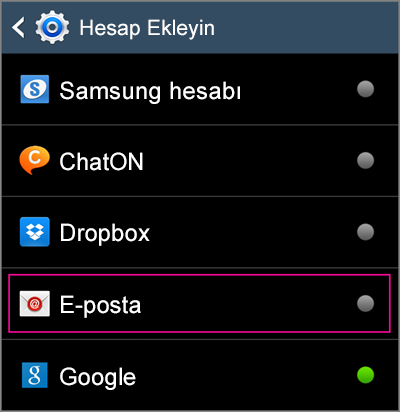
  1. Ayarlar > Hesaplar > Hesap ekle > E-posta’ya dokunun.
  2. Tam e-posta adresinizi (örneğin, <birisi>@outlook.com) ve parolanızı yazın ve İleri'ye dokunun.
    Not   @outlook.co.uk gibi uluslararası etki alanları ve Outlook.com’da barındırılan tüm özel etki alanları da buna dahildir.
  3. Hesap Seçenekleri sayfasında, postanızı nasıl almak istediğinizi gösteren seçenekleri belirtin ve İleri’ye dokunun.
  4. Hesaba bir ad verin ve Bitti’ye dokunun.
Çalışmıyor mu? E-postanızı ve parolanızı doğru girdiğinizden emin olun ve yeniden deneyin. Ayrıca, aşağıdaki adımları izleyerek el ile ayarlamayı da deneyebilirsiniz.
El ile ayarlama
  1. Ayarlar > Hesaplar > Hesap ekle > E-posta’ya dokunun.
    Hesap eklemek için e-posta seçin
  2. Tam e-posta adresinizi (örneğin, <birisi>@outlook.com) ve parolanızı girin ve El ile kurulum'a dokunun.
  3. Exchange öğesini seçin.
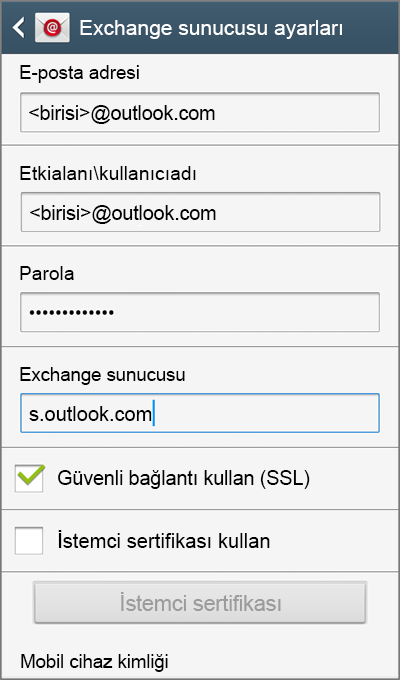
  4. İstenirse, Exchange sunucu ayarları sayfasındaki varsayılan değerleri kabul edin ve İleri’ye dokunun. Cihazınız bağlanamıyorsa, aşağıdaki hesap bilgilerini güncelleştirin.
    • Etki Alanı\Kullanıcı Adı Tam e-posta adresiniz kutuda yoksa, var olanı silin ve tam e-posta adresinizi (örneğin, <birisi>@outlook.com yazın). Etki Alanı ve Kullanıcı Adı cihazınızda ayrı kutular olarak bulunuyorsa, Etki Alanı kutusunu boş bırakın ve Kullanıcı Adı kutusuna tam e-posta adresinizi yazın.
    • Parola Hesabınıza erişmek için kullandığınız parolayı kullanın.
    • Sunucu adı için s.outlook.com yazın.
    • Güvenli bağlantı (SSL) kullan onay kutusunun seçili olduğundan emin olun ve İleri’ye dokunun.
    • Bitti’ye dokunun.
      Exchange sunucusu seçenekleri
Ayrıca, @outlook.com, @hotmail.com, @msn.com veya @live.com email ile biten e-posta hesabınızı denetlemek için cihazınızdaki tarayıcıyı da kullanabilirsiniz. http://m.mail.live.com adresine gidin ve e-posta hesabınızla oturum açın.
Android için diğer Office 365 kaynakları hakkında bilgi için bu sayfanın sonundaki Ayrıca Bkz. bölümüne bakın.

Office 365 kullanan iş veya okul e-posta hesapları ayarlama

İpucu   Android’inizin görünümü farklılık gösterebileceği için, buradaki adımları kılavuz olarak kullanın veya söz konusu cihazınız için üreticinin yardımına danışın.
Outlook uygulaması Android için Outlook uygulamasını kullanma
Android posta uygulaması Yerleşik Android posta uygulamasını kullanma
Not   Android için Outlook için, Android 4.0 veya daha yeni sürümünü çalıştıran bir cihaz gerekir. Uygulama kullanılabilirliği değişiklik gösterebilir, dolayısıyla ülkenizde nelerin kullanılabildiğini öğrenin.
  1. Henüz yüklemediyseniz, Google Play mağazasından Android için Outlook’u indirin.
    Cihazınızda yüklüyse uygulamayı açın ve cihazınıza bağlı olarak, Android’inizin en altındaki gezinme denetimine dokunun veya Diğer > Ayarlar > Hesap Ekle’ye dokunun.
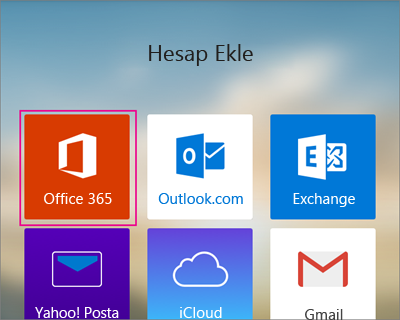
  2. Office 365 İş’te bir iş veya okul hesabı varsa Office 365’e dokunun.
    Office 365'i seçin
  3. Tam e-posta adresinizi (örneğin, taner@contoso.com) ve parolanızı girin, ardından Oturum aç'a dokunun.
    Not   Hesabınızı ayarlamak üzere daha önce Exchange’i seçtiyseniz, güvenlik yükseltmeleri olduğuna ve yeniden oturum açmanız gerektiğine dair bir iletiyle karşılaşabilirsiniz. Sesli yanıtları izleyin ve tam e-posta adresiniz ve parolanızı kullanarak oturum açın.
    Android için Outlook hesabı eşitlemeye başlar.
  4. Uygulamadan takviminizi, dosyalarınızı veya kişilerinizi görüntülemek için, Diğer Diğer seçenekler’e dokunun.
    Posta, takvim, dosya veya kişi seçin
  5. Android için Outlook kullanma konusunda daha fazla bilgi edinmek için, cihazınızın alt tarafındaki gezinme denetimine dokunun veya Menü > Yardım’a dokunun. Veya bkz. iOS ve Android için Outlook hakkında sık sorulan sorular.
Android için Outlook’ta birden fazla hesabınız olabilir. Eklemek istediğiniz hesap türünü seçin ve gösterilen adımları izleyin.
Bir hesabı silme
  1. Cihazınıza bağlı olarak cihazınızın alt tarafındaki gezinme denetimine veya Diğer > Yardım’a dokunun.
  2. Silmek istediğiniz hesaba dokunun.
  3. Hesabı Cihazdan ve Uzaktan Sil’i seçin.
Android için diğer Office 365 kaynakları hakkında bilgi için bu sayfanın sonundaki Ayrıca Bkz. bölümüne bakın.
  1. Ayarlar > Hesaplar > Hesap ekle > E-posta’ya dokunun. Bu uygulama bazı Android sürümlerinde Posta adıyla bulunabilir.
    Hesap eklemek için e-posta seçin
  2. Tam e-posta adresinizi (örneğin, taner@contoso.com) ve parolanızı girin, ardından İleri’ye dokunun.
  3. Exchange seçeneğini belirleyin.
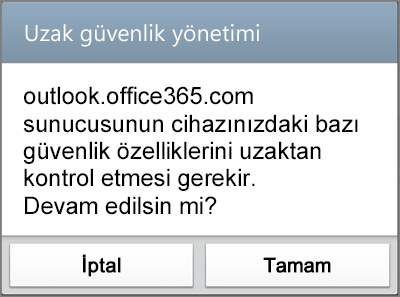
  4. Kuruluşunuzdaki Office 365 yöneticisinin hesabınızı nasıl ayarlandığına bağlı olarak, ek güvenlik özellikleri hakkında bir ileti alabilirsiniz. Devam etmek için Tamam’ı seçin.
    Remote security administration
  5. Cihazınız sunucu ayarlarını doğrulayınca, Hesap Seçenekleri sayfası açılır. Varsayılan değerleri kabul edin veya postanızı nasıl almak ve göndermek istediğinizi gösteren seçenekleri belirtin ve İleri’ye dokunun. (İleri’yi görmek için aşağı kaydırmanız gerekebilir.)
  6. E-posta ayarlama sayfasında hesabınızın adını değiştirebilirsiniz. İşiniz bittiğinde Bitti'ye dokunun.
Cihazınız bağlanamıyorsa e-posta adresini ve parolayı doğru girdiğinizden emin olun ve yeniden deneyin. Hala bağlanamıyorsanız aşağıdaki adımları izleyerek el ile ayarlamayı da deneyebilirsiniz.
El ile ayarlama
  1. Ayarlar > Hesaplar > Hesap ekle > E-posta’ya dokunun. Bu uygulama bazı Android sürümlerinde Posta adıyla bulunabilir.
    Hesap eklemek için e-posta seçin
  2. Tam e-posta adresinizi (örneğin, taner@contoso.com) ve parolanızı girin, ardından İleri’ye dokunun.
  3. El ile’yi seçin.
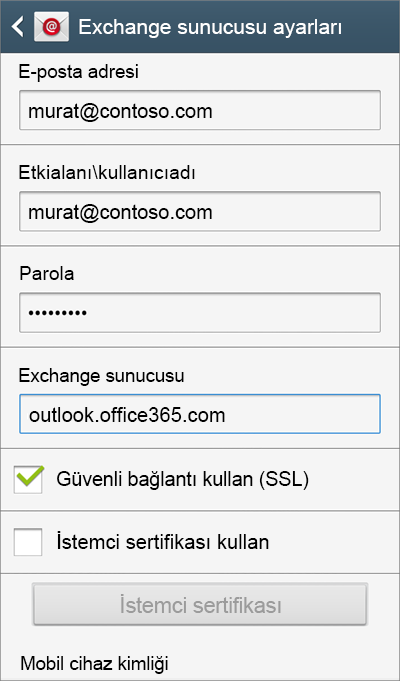
  4. Exchange sunucusu seçenekleri sayfasındaki ayarları gözden geçirin ve gerekirse güncelleştirin.
    • E-posta    Tam e-posta adresinizin (örneğin, taner@contoso.com) kutuda olduğundan emin olun.
    • Etki alanı\Kullanıcı adı    Bu kutuya, tamer@contoso.com gibi tam e-posta adresinizi yazın. Android sürümünüzde Etki alanı ve Kullanıcı adı ayrı metin kutuları ise, Etki alanı kutusunu boş bırakın ve tam e-posta adresinizi Kullanıcı adı kutusuna yazın.
    • Parola    Hesabınıza erişmek için kullandığınız parolayı kullanın.
    • Exchange Server   Office 365 İş sunucusu adı outlook.office365.com şeklindedir.
    • Güvenli bağlantı (SSL) kullan    kutusunun işaretli olduğundan emin olun.
      Exchange sunucusu seçenekleri
  5. Bitti’ye dokunun.
  6. Kuruluşunuzdaki Office 365 yöneticisinin hesabınızı nasıl ayarlandığına bağlı olarak, ek güvenlik özellikleri hakkında bir ileti alabilirsiniz. Devam etmek için Tamam’ı seçin.
    Remote security administration
  7. Varsayılan değerleri kabul edin veya hesabınızın cihazınızla nasıl eşitlenmesini istediğinize bağlı olarak değişiklikler yapın. İşiniz bittiğinde ekranı aşağıya doğru çekin ve İleri’ye dokunun.
  8. E-posta ayarlama sayfasında hesabınızın adını değiştirebilirsiniz. İşiniz bittiğinde Bitti'ye dokunun.
Android için diğer Office 365 kaynakları hakkında bilgi için bu sayfanın sonundaki Ayrıca Bkz. bölümüne bakın.

Exchange tabanlı e-posta hesapları ayarlama

İpucu   Android’inizin görünümü farklılık gösterebileceği için, buradaki adımları kılavuz olarak kullanın veya söz konusu cihazınız için üreticinin yardımına danışın.
Outlook uygulaması Android için Outlook uygulamasını kullanma
Android posta uygulaması Yerleşik Android posta uygulamasını kullanma
Not   Android için Outlook için, Android 4.0 veya daha yeni sürümünü çalıştıran bir cihaz gerekir. Uygulama kullanılabilirliği değişiklik gösterebilir, dolayısıyla ülkenizde nelerin kullanılabildiğini öğrenin.
  1. Henüz yüklemediyseniz, Google Play mağazasından Android için Outlook’u indirin.
    Cihazınızda yüklüyse uygulamayı açın ve cihazınıza bağlı olarak, Android’inizin en altındaki gezinme denetimine dokunun veya Diğer > Ayarlar > Hesap Ekle’ye dokunun.
  2. Kuruluşunuzda Exchange tabanlı bir posta hesabı kullanılıyorsa Exchange’e dokunun.
  3. Tam e-posta adresinizi (örneğin, taner@contoso.com) ve parolanızı girin ve ardından Oturum aç'a dokunun. Android için Outlook hesabı eşitlemeye başlar.
  4. Uygulamadan takviminizi, dosyalarınızı veya kişilerinizi görüntülemek için, Diğer Diğer seçenekler’e dokunun.
    Posta, takvim, dosya veya kişi seçin
  5. Android için Outlook kullanma konusunda daha fazla bilgi edinmek için, cihazınızın alt tarafındaki gezinme denetimine dokunun veya Menü > Yardım’a dokunun. Veya bkz. iOS ve Android için Outlook hakkında sık sorulan sorular.
Android için Outlook’ta birden fazla hesabınız olabilir. Eklemek istediğiniz hesap türünü seçin ve gösterilen adımları izleyin.
Bir hesabı silme
  1. Cihazınıza bağlı olarak cihazınızın alt tarafındaki gezinme denetimine veya Diğer > Yardım’a dokunun.
  2. Silmek istediğiniz hesaba dokunun.
  3. Hesabı Cihazdan ve Uzaktan Sil’i seçin.
Android için diğer Office 365 kaynakları hakkında bilgi için bu sayfanın sonundaki Ayrıca Bkz. bölümüne bakın.
  1. Ayarlar > Hesaplar > Hesap ekle > E-posta’ya dokunun. Bu uygulama bazı Android sürümlerinde Posta adıyla bulunabilir.
    Hesap eklemek için e-posta seçin
  2. Tam e-posta adresinizi (örneğin, taner@contoso.com) ve parolanızı girin, ardından İleri’ye dokunun.
  3. Exchange öğesini seçin.
  4. Kuruluşunuzdaki Exchange yöneticisinin hesabınızı nasıl ayarlandığına bağlı olarak, ek güvenlik özellikleri hakkında bir ileti alabilirsiniz. Devam etmek için Tamam’ı seçin.
  5. Cihazınız sunucu ayarlarını doğrulayınca, Hesap Seçenekleri sayfası açılır. Varsayılan değerleri kabul edin veya postanızı nasıl almak ve göndermek istediğinizi gösteren seçenekleri belirtin ve İleri’ye dokunun. (İleri’yi görmek için aşağı kaydırmanız gerekebilir.)
  6. E-posta ayarlama sayfasında hesabınızın adını değiştirebilirsiniz. İşiniz bittiğinde Bitti'ye dokunun.
Cihazınız bağlanamıyorsa e-posta adresini ve parolayı doğru girdiğinizden emin olun ve yeniden deneyin. Hala bağlanamıyorsanız aşağıdaki adımları izleyerek el ile ayarlamayı da deneyebilirsiniz.
El ile ayarlama
  1. Ayarlar > Hesaplar > Hesap ekle > E-posta’ya dokunun. Bu uygulama bazı Android sürümlerinde Posta adıyla bulunabilir.
    Hesap eklemek için e-posta seçin
  2. Tam e-posta adresinizi (örneğin, taner@contoso.com) ve parolanızı girin, ardından İleri’ye dokunun.
  3. El ile’yi seçin.
  4. Exchange sunucusu seçenekleri sayfasındaki ayarları gözden geçirin ve gerekirse güncelleştirin.
    • E-posta    Tam e-posta adresinizin (örneğin, taner@contoso.com) kutuda olduğundan emin olun.
    • Etki alanı\Kullanıcı adı    Bu kutuya, tamer@contoso.com gibi tam e-posta adresinizi yazın. Android sürümünüzde Etki alanı ve Kullanıcı adı ayrı metin kutuları ise, Etki alanı kutusunu boş bırakın ve tam e-posta adresinizi Kullanıcı adı kutusuna yazın.
    • Parola    Hesabınıza erişmek için kullandığınız parolayı kullanın.
    • Exchange Server   Office 365 İş sunucusu adı outlook.office365.com şeklindedir. Exchange Sunucunuzun adını bilmiyorsanız yöneticinize başvurun.
    • Güvenli bağlantı (SSL) kullan    kutusunun işaretli olduğundan emin olun.
      Exchange sunucusu seçenekleri
  5. Bitti’ye dokunun.
  6. Kuruluşunuzdaki Exchange yöneticisinin hesabınızı nasıl ayarlandığına bağlı olarak, ek güvenlik özellikleri hakkında bir ileti alabilirsiniz. Devam etmek için Tamam’ı seçin.
  7. Varsayılan değerleri kabul edin veya hesabınızın cihazınızla nasıl eşitlenmesini istediğinize bağlı olarak değişiklikler yapın. İşiniz bittiğinde ekranı aşağıya doğru çekin ve İleri’ye dokunun.
  8. E-posta ayarlama sayfasında hesabınızın adını değiştirebilirsiniz. İşiniz bittiğinde Bitti'ye dokunun.
Android için diğer Office 365 kaynakları hakkında bilgi için bu sayfanın sonundaki Ayrıca Bkz. bölümüne bakın.

IMAP veya POP e-posta hesapları ayarlama

İpucu   Android’inizin görünümü farklılık gösterebileceği için, buradaki adımları kılavuz olarak kullanın veya söz konusu cihazınız için üreticinin yardımına danışın.
Outlook uygulaması Android için Outlook uygulamasını kullanma
Android posta uygulaması Yerleşik Android posta uygulamasını kullanma
Bir IMAP hesabı ayarlıyorsanız, Android için Outlook kullanabilirsiniz. Bir POP hesabı ayarlamak isterseniz, cihazınızla birlikte gelen Android posta uygulamasını kullanın.
Not   Android için Outlook için, Android 4.0 veya daha yeni sürümünü çalıştıran bir cihaz gerekir. Uygulama kullanılabilirliği değişiklik gösterebilir, dolayısıyla ülkenizde nelerin kullanılabildiğini öğrenin.
  1. Henüz yüklemediyseniz, Google Play mağazasından Android için Outlook’u indirin.
    Cihazınızda yüklüyse uygulamayı açın ve cihazınıza bağlı olarak, Android’inizin en altındaki gezinme denetimine dokunun veya Diğer > Ayarlar > Hesap Ekle’ye dokunun.
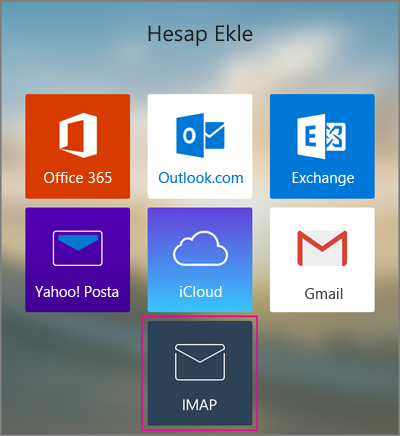
  2. IMAP’e dokunun.
    IMAP hesabı ekleme
  3. Görünen adınızı, tam e-posta adresinizi (örneğin, taner@contoso.com) ve parolanızı yazın ve İleri’ye dokunun. Android için Outlook hesabı eşitlemeye başlar.
  4. Uygulamadan takviminizi, dosyalarınızı veya kişilerinizi görüntülemek için, Diğer’e dokunun.
    Posta, takvim, dosya veya kişi seçin
  5. Android için Outlook kullanma konusunda daha fazla bilgi edinmek için, cihazınızın alt tarafındaki gezinme denetimine dokunun veya Menü > Yardım’a dokunun. Veya bkz. iOS ve Android için Outlook hakkında sık sorulan sorular.
Android için Outlook’ta birden fazla hesabınız olabilir. Eklemek istediğiniz hesap türünü seçin ve gösterilen adımları izleyin.
Bir hesabı silme
  1. Cihazınıza bağlı olarak cihazınızın alt tarafındaki gezinme denetimine veya Diğer > Yardım’a dokunun.
  2. Silmek istediğiniz hesaba dokunun.
  3. Hesabı Cihazdan ve Uzaktan Sil’i seçin.
Android için diğer Office 365 kaynakları hakkında bilgi için bu sayfanın sonundaki Ayrıca Bkz. bölümüne bakın.
Not   POP veya IMAP hesabı ayarlıyorsanız, yalnızca e-postanız cihazınızla eşitlenir. Bu hesapla ilişkili tüm takvim ve kişiler yerel bilgisayarınızda depolanmış olarak kalır.
  1. Uygulamalar menüsünden E-posta'yı seçin. Bazı Android sürümlerinde bu uygulamanın adı Posta da olabilir.
  2. Tam e-posta adresinizi (örneğin, taner@contoso.com) ve parolanızı yazın, ardından El ile'yi seçin.
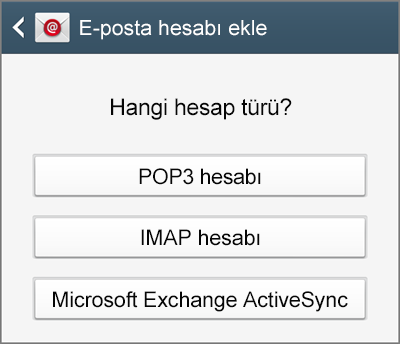
  3. Ayarladığınız hesabın türüne bağlı olarak, IMAP veya POP’u seçin.
    Ayarlamak için hesabın türünü seçin
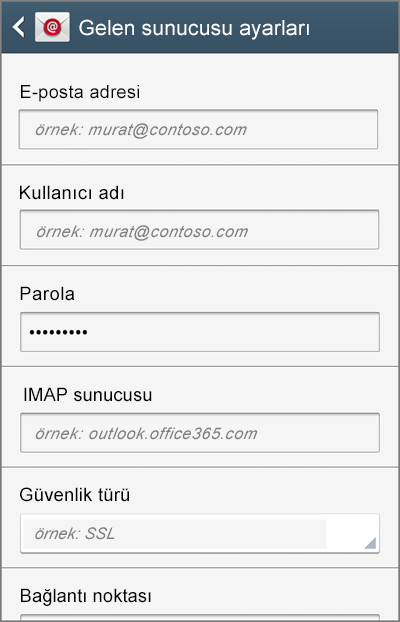
  4. Gelen sunucu ayarları sayfasında, e-posta adresinizin doğru olduğunu denetleyin ve aşağıdakileri ekleyin.
    İpucu   E-posta için Office 365 İş kullanmıyorsanız ve bu adımları gerçekleştirmek için gereken sunucu ve bağlantı noktası ayarlarını bilmiyorsanız, e-posta sağlayıcınıza başvurun.
    • Etki alanı\Kullanıcı adı Bu kutuya, tamer@contoso.com gibi tam e-posta adresinizi yazın. Android sürümünüzde Etki alanı ve Kullanıcı adı ayrı metin kutuları ise, Etki alanı kutusunu boş bırakın ve tam e-posta adresinizi Kullanıcı adı kutusuna yazın.
    • Parola Hesabınıza erişmek için kullandığınız parolayı kullanın.
    • IMAP SunucusuveyaPOP3 Sunucusu Sunucunuzun adresini kullanın. Örneğin, Office 365 İş sunucu adı outlook.office365.com şeklindedir.
    • Güvenlik türü Güvenlik türünü seçin. Örneğin, Office 365 İş için gelen güvenlik türü SSL’dir.
    • Bağlantı noktası numarası Bağlantı noktası numarasını ekleyin. Örneğin, Office 365 İş için bağlantı noktası numarası 993’tür. İleri’ye dokunun.
      Incoming server settings
    • Ek güvenlik özellikleri hakkında bir ileti alırsanız, devam etmek için Tamam’ı seçin.
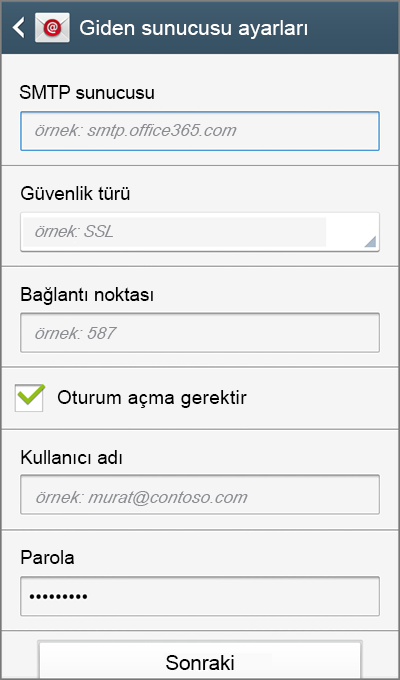
    Giden sunucusu ayarları sayfasında aşağıdakileri ekleyin:
    • SMTP sunucusu SMTP sunucunuzun adını yazın. Örneğin, Office 365 İş için giden sunucusu smtp.office365.com şeklindedir.
    • Güvenlik türü Güvenlik türünü seçin. Örneğin, Office 365 İş için giden güvenlik türü TLS şeklindedir.
    • Bağlantı noktası numarası Bağlantı noktası numaranızı ekleyin. Örneğin, Office 365 İş için giden bağlantı noktası numarası 587 şeklindedir. İleri’ye dokunun.
      Outgoing server settings
  5. Hesap adında, bu hesap için bir ad yazın. Başkalarına e-posta gönderirken, istediğiniz bu ad görüntülenir.
  6. Bitti’ye dokunun.
    İpucu    Hesabınızı ayarladıktan sonra e-posta gönderip alabilmek için on ila on beş dakika kadar beklemeniz gerekebilir.
Android için diğer Office 365 kaynakları hakkında bilgi için bu sayfanın sonundaki Ayrıca Bkz. bölümüne bakın.

Ne tür e-posta hesabınız olduğunu bilmiyor musunuz? İşte bir ipucu

Ne tür hesabınız olduğunu bilmiyor musunuz? E-posta sağlayıcınıza danışın. Eklemek istediğiniz e-posta hesabını Outlook kullanarak bir PC veya Mac’te zaten ayarladıysanız bunu deneyin.
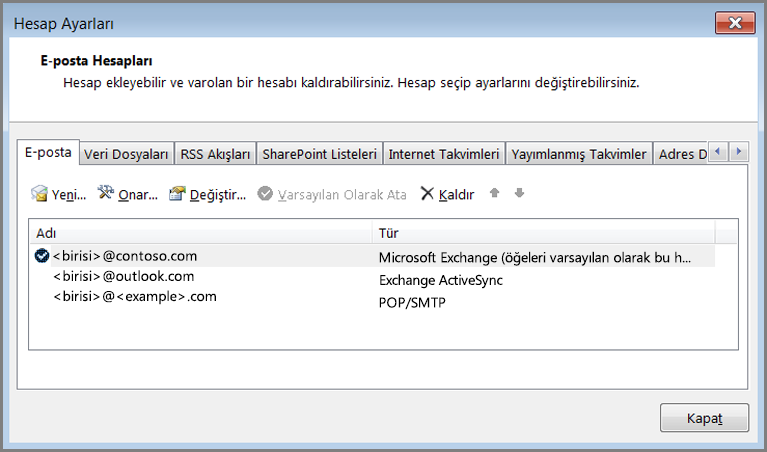
  1. Outlook’ta Dosya > Bilgiler > Hesap Ayarları’nı seçin.
  2. Hesap Ayarları penceresinde ne tür bir hesap olduğunu görmek için Tür sütununa göz atın.
    See the type of account you have in the Account Settings window in Outlook

Ayrıca Bkz:

Android telefon veya tablette Office’i yükleme ve kurma
Office 365’i yükleme ve kurma - Yardım


Kaynak :  https://support.office.com/tr-tr/article/Android-telefon-veya-tablette-e-posta-ayarlar%C4%B1n%C4%B1-yapma-886db551-8dfa-4fd5-b835-f8e532091872?ui=tr-TR&rs=tr-TR&ad=TR