20 Kasım 2019 Çarşamba

Outlook'da Printer Alma Sorunu ( Microsoft Outlook Printing Problems in All Outlook Versions )


Cannot print unless an item is selected.

Tanılar :

Microsoft Outlook is a great amenity to its users which includes many needful features that easy the digital work. It includes a Print feature for Outlook emails which having connection with a Printer device can easily print the emails residing in it. In Outlook, users just need to select the emails, go to File>Print option to print those emails.

However, MS Outlook users encounter some printing issues in almost each version randomly. Some issues related to this Print function in Outlook are:

“Printer is unavailable”
“Printer is not ready”
“Print Pictures Error”
“Problem with the selected printer”
“Improper printing of emails”
“Header information not included in print”

These issues simply annoy the user when he is involved in some tight and important work. Unable to take out the prints at that time seems quite frustrating and worthless but do not worry. In this article, we would suggest you some quick manual tricks to fix this emails printing issue in Outlook. As we have mentioned earlier, for different versions of Outlook, the printing problem is different along with their causes. We are going to categorize then in 3 divided set of versions and discuss the issues with causes and then head upon their solutions.

Çözüm :

Aşağıdaki çözümlerden ilk birinci olan çözüm işe yaramıştır.

Soluton 1. Renaming Outlprnt File

OUTLOOK PRINTING PROBLEMS AND SOLUTIONS

Outlook 2013, 2016 And 2019

Issue – The main issue that users are facing in the recent versions of Outlook is when they try to print any selected email, the Outlook throws an error “Printer is not ready” or “Cannot print unless an item is selected. Select an item, and then try to print again.” which ultimately halts the print action.
Cause – The supposed reasons behind this issue could be improper connection with printer, network issue, corrupted OutlPrnt file, interruption due to active Add-ins or any issue in Print spooling service in Outlook.
Solution – Here are provided some quick tricks that you can try to fix MS Outlook Printing Problems.

Soluton 1. Renaming Outlprnt File

You can resolve the issue by rebuilding the OutlPrnt file which holds the Outlook printing style settings as the older one may get corrupted. Perform these steps.

Close the running Outlook application.
Find the OutlPrnt file either using the search option or following the path “%appdata%\Microsoft\Outlook”.
Double click on it and rename it with some other name like OutlPrnt1.
Now, run the Outlook application again and see if it is printing normally.
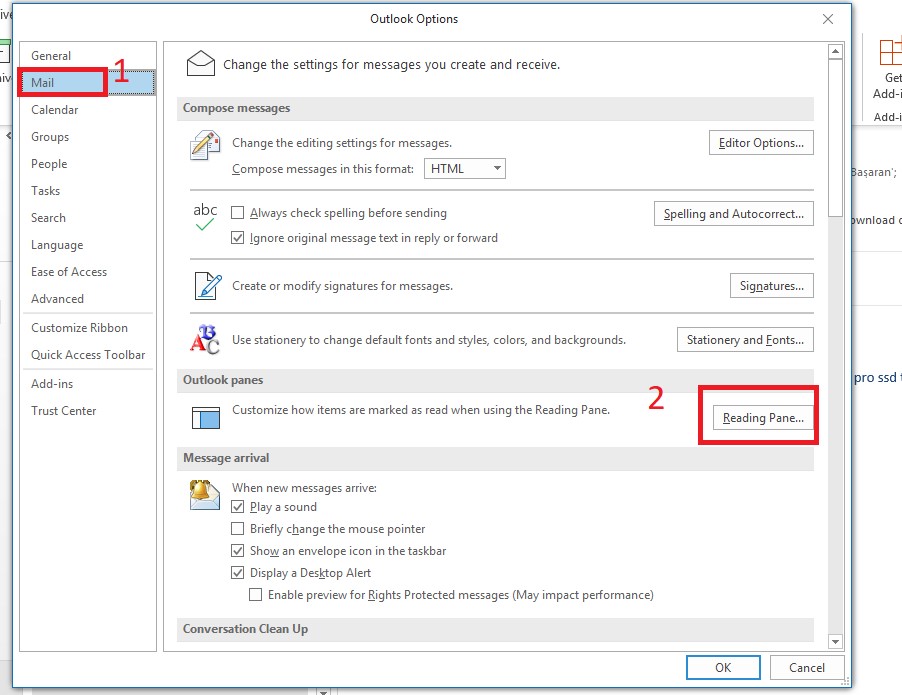
Soluton 2. Checking Add-Ins

Users can check on active Add-Ins, disable them one-by-one and restart the Outlook application. Check after which Add-In disable, the Outlook Printing problem is resolved.

To locate the Add-Ins page, go to File>Options>Add-Ins.
Note: Outlook must be run in safe mode.

Soluton 3. Running Printing Troubleshooting Tool

Users can try to resolve the printing issue through the troubleshooting tool. Let us see how.

Check for network connections and that printer has no issues.
Download the free printing troubleshooting tool online and install it.
Run this installed tool and fix the issue.
Check in Outlook if the issue is resolved.
Soluton 4. Restarting Print Spooler service

It is a system service whose function is to manage the printing services. By restarting it again, the problem could be resolved.

Type Services in the Windows run dialog box and it will open the Windows Services page.
Find Print Spooler service within the list, double click on it and select Stop.
Again in the search bar, type %WINDIR%\system32\spool\printers and delete the files existing in that folder.
After that, navigate to Windows Services as in step a and then restart the Print Spooler service.
Soluton 5. Updating the Driver

This is also an option, if the above solutions are not helping. You can update the driver for printer like this.

Go to the Device Manager.
Navigate to Printer options, select the Outlook printer and click on Update Driver option.
Run the Outlook application again and try printing the email.
Outlook 2010

Issue – The most common issue in this version is misprinting or no printing of header while printing the email in Outlook. Due to disorganized header, the email prints improperly.
Cause – The reason could be that the message or mail is not arranged adequately within the printing page.
Solution – In this case, users can open the message in a browser and then click on View option there and then print or select the desired part for print to avoid the header issue.

Outlook 2007 and Earlier Versions

Issue – In the old versions of Outlook, the most prevalent issue related to Outlook printing is that emails are not printing properly, header information is unavailable and selection of pages is not functioning.
Cause – Message not arranged properly in printing page, restrictions in Internet Explorer web browser, HTML formatting issue.
Solution –

Soluton 1. Open Message in Browser and Print
Users can select the message and change it to HTML format by clicking on Edit Message option. Then, click on Other Actions and then select View in Browser. Finally, printing the message.

Soluton 2. Upgrading the Internet Explorer
For earlier versions like 2003 or older, one technique to resolve the issue could be upgrading the Internet Explorer version.

We have discussed all the possible manual tricks for almost all Outlook versions. Try them accordingly to fix the MS Outlook Printing Problems. If you are not getting the problem fixed, then possibly the PST file needs repair. Get complete solution for repairing the Outlook PST file with the PST Repair tool compatible with all Outlook versions. Know all about the tool from this link.

Kaynak : datarepairtools

19 Kasım 2019 Salı

Linux Mint ya da Ubuntu Printer Kurulumu

Öncelikle Kyocera Resmi Sitesinden Linux İçin Yazıcı Sürücüsü İndirilerek Kurulumu sağlanacaktır.
- Linux_8.1304_TASKalfa2551ci.zip
- Zipli dosyayı indirdikten sonra açalım içindeki PPD dosyasını göreceksiniz.Bunu daha sonra aşağıdaki ilerleyen adımlarda kuracağız.
- Mint başlat uygulama menüsünden Printers uygulamasınıda açtığımızda aşağıdaki menü gelmektedir.


Add yazan yeri tıklıyoruz.Aşağıdaki ekranda LDP /LPR Host or Printer yazan yeri tıklıyoruz.Host yazan yere MYQ sunucu adresi “192.168.x.x” yazıyoruz.Queue yazan kutucuğa “printer” yazıyoruz.


Forward yazan yeri tıklıyoruz.


Yukarıdaki ekranda“Provide PPD file” seçiyoruz ilk Kyocera resmi sitesinden indirdiğimiz açtığımız zipteki PPD dosyasını gösteriyoruz.Forward diyerek devam ediyoruz.


Aşağıdaki ayarlarda herhangi bir değişiklik yapmadan devam ediyoruz.


Yine aşağıdaki ekranda bir değişiklik yapmadan “Apply” diyerek kurulumu tamamlıyoruz.


Yine aşağıdaki ekranda bir değişiklik yapmadan “Apply” diyerek kurulumu tamamlıyoruz.


Son olarak aşağıdaki ekranda Location yazan yere sunucu adresi “192.168.x.x” yazılarak “Apply” diyerek kurulum süreci tamamlanacaktır.


Bundan sonra MYQ sunucu ayarları için test sayfası atılacaktır.Linux kullanıcı adı bilinmiyor ise MYQ admin panel tarafında log kısmında hata logu mavi olarak görülür şu kullanıcı çıktıyı alamadı diye burdan kullanıcı adı tespiti yapılır.


Yukarıdaki resimde MYQ admin panelinde kullanıcılar bölümünde kullanıcı bulunur.Takma ad yazan yere bu kullanıcı adı yazılarak kaydedilir.Bu şekilde kurulumlar tamamlanmış olacaktır.

12 Kasım 2019 Salı

Office365 Outlook Kurulum Hatası ( Something went wrong )

Office365 tarafında outlook kurulumunda " Something went wrong " hatası alınıyor ise Control Panel  ( Denetim Masası )  Credential Manager tıklıyoruz. Windows Credentials içerisindeki Office ile ilgili ne var ne yok hepsini sildikten sonra tekrar denediğinizde sorun giderilecektir.


11 Kasım 2019 Pazartesi

Macbook Kyocera Printer Kurulumu

Öncelikle Kyocera resmi sitesinden Mac için yazıcı sürücüsü indirilerek kurulumu sağlanacaktır.

Printer ekle diyerek aşağıdaki alanlar doldurulacaktır.

- Protokol kısmı " Line Printer Daemon - LPD " seçilecektir.
- Adress Kısmına " 192.168.X.X " sunucu ip adresi yazılacaktır.
- Queue kısmına " printer " yazılacaktır.
- Printer Using ( Software Selection ) yazan yerden " Kyocera 2551ci " seçilecektir.

Tüm bu işlemlerden sonra kayıt edilerek çıkılacaktır.

MYQ admin panel tarafında loglarda mac kullanıcı adını bilinmiyor ise tespit için bir tane mac tarafında test çıktısı gönderilir.

Daha sonra log ksımında hata logu mavi olarak görülür şu kullanıcı çıktıyı alamadı diye burdan kullanıcı adı tespiti yapıldıktan sonra.

MYQ admin panelinde kullanıcılar kullanıcı bulunur.Takma ad yaza yere bu kullanıcı adı yazılarak kaydededilir.Bu şekilde kurulumlar tamamlanmış olacaktır.

30 Ekim 2019 Çarşamba

Shared mailbox paylaşımı mail adresi ekleme


Add a shared mailbox to Outlook

After your admin has added you as a member of a shared mailbox, close and then restart Outlook. The shared mailbox should automatically display in your Folder pane in Outlook.
Shared mailbox displays in Folder List in Outlook
What if it didn't work?
  • If your admin only recently added you to a shared mailbox, it may take a few minutes before the shared mailbox appears. Wait a bit and then close and restart Outlook again.
  • If that didn't work, then manually add the shared mailbox to Outlook:
    1. Open Outlook.
    2. Choose the File tab in the ribbon.
    3. Choose Account Settings, then select Account Settings from the menu.
    4. Select the Email tab.
    5. Make sure the correct account is highlighted, then choose Change.
    6. Choose More Settings > Advanced > Add.
    7. Type the shared email address, such as info@contoso.com.
    8. Choose OK > OK.
    9. Choose Next Finish > Close.

Send mail from the shared mailbox

  1. Open Outlook.
  2. Choose New Email.
  3. If you don't see the From field at the top of your message, choose Options > From.
  4. Click From in the message, and change to the shared email address. If you don't see your shared email address, choose Other email address and then type in the shared email address.
  5. Choose OK.
  6. Finish typing your message and then choose Send.
    From now on when you want to send a message from your shared mailbox, the address will be available in your From drop down list.
    Whenever you send a message from your shared mailbox, your recipients will only see the shared email address in the message.

Reply to mail sent to the shared mailbox

  1. Open Outlook.
  2. Open the email message you want to reply to.
  3. From field at the top of your message, you should see the name of your shared mailbox. If you don't, choose the From dropdown box and choose your shared mailbox.
  4. Finish typing your message and then choose Send.
    When you want to send a message from your shared mailbox, the address will be available in your From drop down list.
    Whenever you send a message from your shared mailbox, your recipients will only see the shared email address in the message.

Use the shared calendar

After your admin has added you as a member of shared mailbox, close and then restart Outlook. The shared calendar associated with the shared mailbox is automatically added to your Calendars list.
  1. In Outlook go to calendar view, and choose the shared mailbox.
    Choose the calendar view
  2. When you enter appointments, everyone who is a member of the shared mailbox will be able to see them.
  3. Any member of the shared mailbox can create, view, and manage appointments on the calendar, just like they would their personal appointments. Everyone who is a member of shared mailbox can see their changes to the shared calendar.

Use the shared contact list

After your admin has added you as a member of shared mailbox, close and then restart Outlook. The shared contact list associated with the shared mailbox is automatically added to your My Contacts list.
  1. In Outlook, choose People.
  2. Under My Contacts, choose the contacts folder for the shared contacts list.
    Shared contacts list displays in Contacts Pane in Outlook

Use a shared mailbox on a mobile device (phone or tablet)

To access a shared mailbox on a mobile device, use the following steps. 
  1. Sign in to your primary account in Outlook for iOS or Android.
  2. Tap the Add Account button in the left navigation pane, then tap Add a Shared Mailbox.
    Add a shared mailbox to Outlook Mobile.
  3. If you have multiple accounts in Outlook Mobile, select the account that has permissions to access the shared mailbox.
    Select the account that has permissions to your shared mailbox.
After the account setup process completes, the shared mailbox will display in your account list in Outlook for iOS or Outlook for Android. 
To remove a shared mailbox, go to Settings Accounts. Then tap on the shared mailbox and select Delete Account


Send automatic replies from a shared mailbox

Only your Office 365 admin has permissions to set this up. For instructions, see Create a shared mailbox.

Kaynak : Microsoft

27 Mayıs 2019 Pazartesi

Cep telefonu mail okundu ayarı için

Merhabalar,

Outlook mail kontrollerini outlooktan okuduğunuzda cep telefonunuzdaki mail hesabunızda da okundu olarak ayarlamak istiyorsanız aşağıdaki ayarları yapmanız gerekmektedir.Outlook açtıktan sonra aşağıdaki ayarları sırası ile yapmanız gerekmektedir.


Yukarıda outlook'ta sırası ile ilerlediğinizde birinci ve ikinci adımları tıkadıktan sonra sadece aşağıdaki yerlerin seçili olması gerekiyor.Özellikle kırmızı ile işaretlediğim yer seçili olmayabilir bunu kontrol etmeniz gerekmektedir.


Host name öğrenme ve cihazın domain durumu

Merhabalar,

- Bir cihazda hostname öğrenmek için aşağıdaki komut ile cmd komut satırından kontrol edebilirsiniz.

ping -a ip adresi

Bir makinenin domainden düşüp düşmediğini komut satırı yazıp gelen cevaba göre anlaşılıyor. 

Komut Satırı : net user cengiz.kaya /domain

- Domainde olan bir client domainden düşüp düşmediğini aşağıdaki komut ile sorgulayabilirsiniz.

net user kullanıcıadı /domain 


ERROR 1962 Lenovo – No Operating System Found Fix

1- First of all, when you have been faced with Error 1962: No Operating System Found, press and hold the key combination of Ctrl + Alt + Delete. This will reboot your system.
2- In order to enter the BIOS setup, press the F12 several times in a row.
3- A little box will appear on your screen and you will see the word Setup written in it. Hit Enter.
4- At the top of the screen select the Startup tab.
5- After this, go ahead and select CSM and hit Now select the Enabled option.
6- Go down a little and locate Boot Priority, after which hit Enter. Now change the current option of Legacy First to UEFI First.
7- Finally, press the F10 key and choose YES. With this you will have completed the steps to resolving ERROR 1962: No Operating System Found and should no longer be present, when you switch your computer on.

Once you’ve finished with the last step, your computer will reboot and load as usual, hopefully without displaying the above error message.

Tiger dil ayarı sorunu çözümü

Merhabalar,

Aşağıdaki ayarlardan sırası ile Türkçe seçildiğinde sorun çözülecektir.


.net Framework 3.5 Kurulumu

Merhabalar,

Kurulumu üç yol ile yapabilirsiniz.En basit yol üçüncü yol fakat bazen işe yaramayabilir.

1. Yol :

Windows 10 Kurulum cd yada iso image ile yapabilirsiniz.İso'yu cihaza mount etmeniz gerekmektedir.Bunun için ultraiso kullanabilirsiniz.

.Net Framework 3.5 offline kurulumu için;
Öncelikle işletim sistemini kurduğumuz CD takıyoruz veya USB bilgisayara mount ediyoruz
Explorerde ‘’bu bilgisayar’’(This Pc)çift tıklayalım ve kurulum medyasının yeraldığı sürücü harfini not edelim.
Linkteki dosyada bulunan exe'yi çalıştırarak Windows medyasının sürücü harfini seçelim
‘’Install’’ butonuna tıklayarak kurulumu başlatalım.


Kurulum tamamlandı uyarısı alındığında ise bilgisayarı restart ederek işlemlerimizi sonlandıralım.

2. Yol :

CMD komut satırını Admin olarak açıyoruz.İsoyu yine ultra iso ile mount ettikten sonra, mount edilen sürücü hangi harf ise aşağıdaki komutta /LimitAccess önüne bu harfi yazıyoruz.

Dism.exe /online /enable-feature /featurename:NetFX3 /source:C:\ /LimitAccess


3. Yol :

Aşağıdaki linkten offline paketi çekerek kurulumu yapabilirsiniz.

Net Framework 3.5 offline installer 10


Printer Kağıt Boyutları ( A1 , A2 , A3 , A4 , A5 ..... )

24 Mayıs 2019 Cuma

file system error (-2147 hatalarında yapılacaklar

Merhabalar,

Windows 10 da açılmayan fotoğraf olurda " file system error (-2147.. "hatası verirse aşağıdaki adımları uygulayabilirsiniz.2. 3.  ve 5. adımlar powershellde uygulanacak.İlk iki adım bende işe yaramadı 3. adımda sorun çözüldü.

Solution 2 1:42
Get-AppxPackage Microsoft.Windows.Photos | Remove-AppxPackage

Solution 3 2:48
Get-AppXPackage | Foreach {Add-AppxPackage -DisableDevelopmentMode -Register "$($_.InstallLocation)\AppXManifest.xml"}

Solution 4 3:32 ( komut satırında uygulanacak )
sfc /scannow

Solution 5: 4:28
Download PSTools https://docs.microsoft.com/en-us/sysinternals/downloads/psexec

Get-AppxPackage Microsoft.Windows.Photos | Remove-AppxPackage

(LOCATION)\PsExec.exe  -sid  c:\windows\system32\cmd.exe

rd /s "C:\Program Files\WindowsApps\Microsoft.Windows.Photos_2018.18051.17710.0_x64__8wekyb3d8bbwe"

Kaynak : https://www.youtube.com/watch?v=qF1QcY0h7Qs 

Varsayılan program kurulum dizinini değiştirmek

Bilgisayarınızda C sürücüsünde yer mi kalmadı? Windowsta default olarak bu C sürücüsü olarak gelir.Kurulacak yazılımları başka bir sürcünüze kurmak istiyorsunuz o zaman aşağıdaki adımları takip etmeniz gerekmektedir.

32 bit mimariye sahip Windows işletim sistemi kullanıyorsanız:

1. Yerel Disk (D:)'de Program Files isimli bir klasör oluşturun.

2. Çalıştır'ı açın, regedit yazın ve Tamam'ı tıklatarak Kayıt Defteri Düzenleyicisi'ni açın.

3. HKEY_LOCAL_MACHINE\Software\Microsoft\Windows\CurrentVersion dizinini izleyin.

4. Sağ tarafta ProgramFilesDir anahtarına çift tıklayın varsayılan değeri D:\Program Files olarak atayın, Tamam'ı tıklatın.

5. Sağ taraftaki ProgramFilesPath anahtarına çift tıklayın ve varsayılan değeri D:\Program Files olarak atayın, Tamam'ı tıklatarak Kayıt Defteri Düzenleyicisi'ni kapatın ve bilgisayarınızı yeniden başlatın.

64 bit mimariye sahip Windows işletim sistemi kullanıyorsanız:

1. Yerel Disk (D:)'de Program Files ve Program Files (x86) isimli iki klasör oluşturun.

2. Çalıştır'ı açın, regedit yazın ve Tamam'ı tıklatarak Kayıt Defteri Düzenleyicisi'ni açın.

3. HKEY_LOCAL_MACHINE\Software\Microsoft\Windows\CurrentVersion dizinini izleyin.

4. Sağ tarafta ProgramFilesDir anahtarına çift tıklayın varsayılan değeri D:\Program Files olarak atayın, Tamam'ı tıklatın.

5. Sağ taraftaki ProgramFilesPath anahtarına çift tıklayın ve varsayılan değeri D:\Program Files olarak atayın.

6. Sağ taraftaki ProgramW6432Dir anahtarına çift tıklayın ve varsayılan değeri  D:\Program Files olarak atayın.

7. Sağ taraftaki ProgramFilesDir (x86) anahtarına çift tıklayın ve varsayılan değeri D:\Program Files (x86) olarak atayın.

8. Kayıt Defteri Düzenleyicisi'ni kapatın ve bilgisayarınızı yeniden başlatınız.

29 Nisan 2019 Pazartesi

The recovery server could not be contacted

Macbook kurulum hatasında yapılacak işlemler aşağıdaki videoda aktarılmıştır.Kısaca saat ayarlarını terminalden güncellemek gerekmektedir.


10 Ocak 2019 Perşembe

Windows 10 Sürümleri Özellikler ve Karşılaştırma Tablosu

Özellik Windows 10 Home Windows 10 Pro Windows 10 Enterprise Windows 10 Education


Mimari


32 bit & 64 bit
Satın Alma & Lisanslama Modeli OEM & Retail OEM & Retail & Volume Volume Licensing Volume Licensing
N Edition? Evet Evet Evet Evet
Maximum RAM 4GB(32bit) 128GB(64bit) 4GB(32bit) 512(64bit)
Süreklilik(Continuum) Evet Evet Evet Evet
Cortana Evet Evet Evet Evet
Donanım Aygıt Şifreleme (Hardware Device Encryption) Evet Evet Evet Evet
Microsoft Edge Evet Evet LTSB Hariç Evet
Microsoft Account Evet Evet Evet Evet
Mobil Aygıt Yönetimi Evet Evet Evet Evet
Sanal Masaüstü Evet Evet Evet Evet
Windows Hello Evet Evet Evet Evet
Assigned Access 8.1 Hayır Evet Evet Evet
BitLocker ve EFS Hayır Evet Evet Evet
İş Mağazası (Business Storage) Hayır Evet Evet Evet
Current Branch for Business (CBB) Hayır Evet Evet Evet
Etkialanı Üyeliği & Group Policy Yönetimi Hayır Evet Evet Evet
Enterprise Data Protection Hayır Evet Evet Evet
Enterprise Mode Internet Explorer (EMIE) Hayır Evet Evet Evet
Hyper-V Hayır Sadece 64bit Sadece 64bit Sadece 64bit
Azure AD Üyeliği Hayır Evet Evet Evet
Private Catalog Hayır Evet Evet Evet
Uzak Masaüstü Bağlantısı Sadece Client Client & Host Client & Host Client & Host
Windows Update for Business Hayır Evet Evet Evet
AppLocker Hayır Hayır Evet Evet
BranchCache Hayır Hayır Evet Evet
Credential Guard Hayır Hayır Evet Evet
Device Guard Hayır Hayır Evet Evet
DirectAccess Hayır Hayır Evet Evet
Start Screen Control (GPO ile) Hayır Hayır Evet Evet
User Experiance Control Hayır Hayır Evet Evet
Windows To Go Hayır Hayır Evet Evet
Long Term Servicing Branch (LTSB) Hayır Hayır Evet Hayır
In-Place Upgrade from Pro to Enterprise Hayır Evet Evet Hayır
In-Place Upgrade from Home or Pro to Education Evet Evet Hayır Evet